Mega Powerful Nitrate and Phosphate Remover
#1
Mega Powerful Nitrate and Phosphate Remover
(Note: This is an updated and simplified version of my threads elsewhere on the web. I'm posting here for those people that don't yet know about the topic.)
If you are tired of algae on your rocks, and if you have to clean your glass more than once a week, then I'm sure you've been told (or you've figured out) that your Nitrate and/or Phosphate are too high. Sure enough, if they are too high, the green stuff starts growing. Phosphate is the important one: If you can detect any phosphate at all with a hobby test kit (like Salifert, etc), then it's high enough to cause algae to grow. So, what can you do?
Build an Algae Scrubber! As of July 2009, thousands of people have built scrubbers for their tanks (and hundreds of them have posted on my other threads), and all have achieved reduced nuisance algae. Many of them have wiped it out completely.
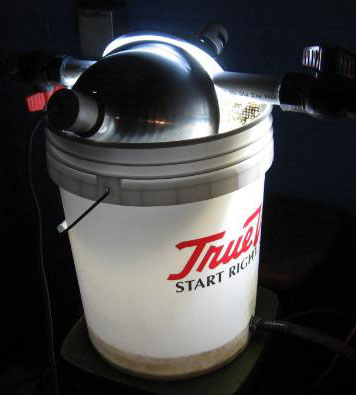
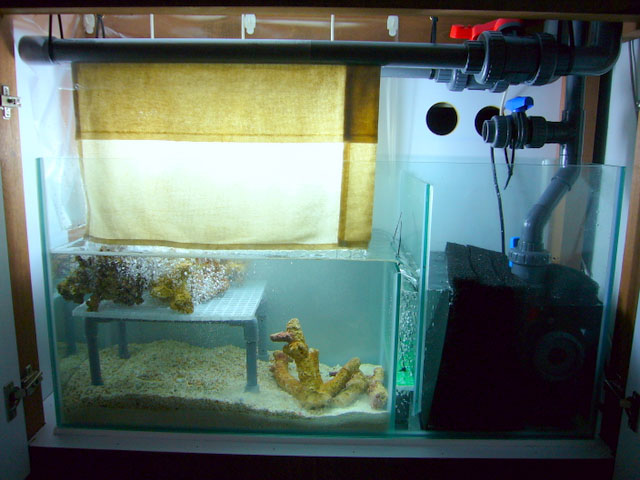
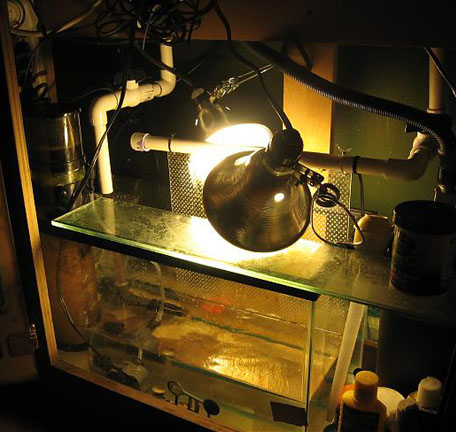
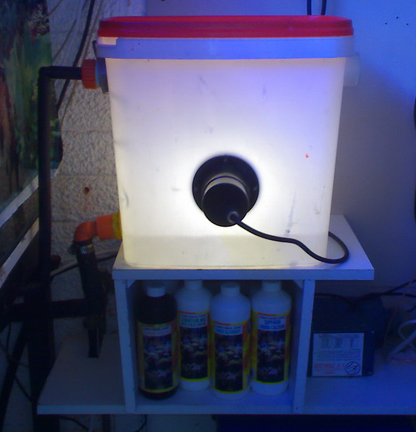
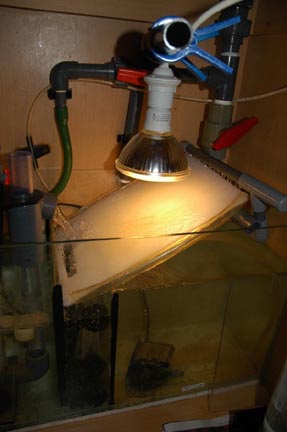
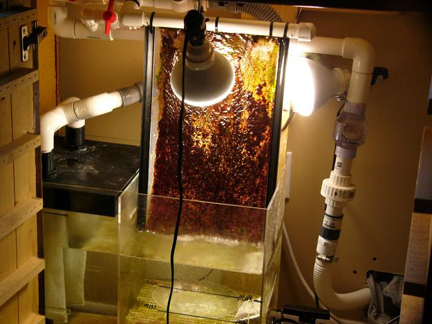
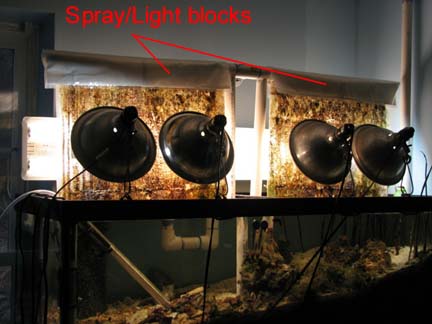
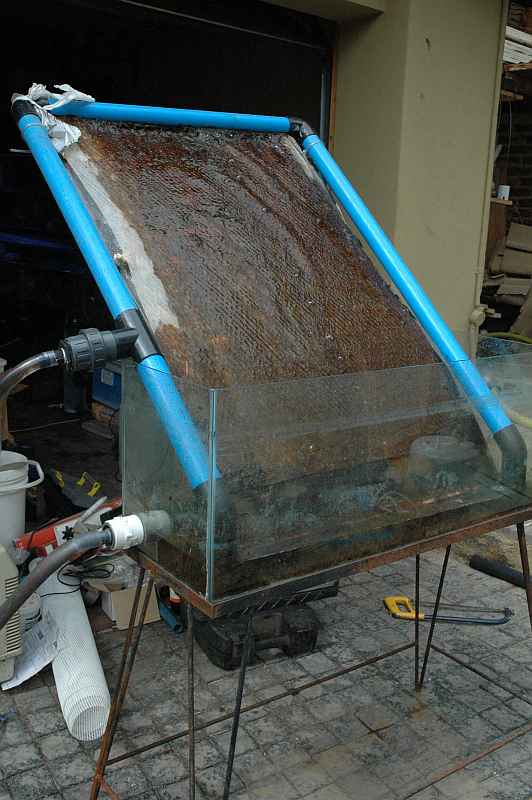
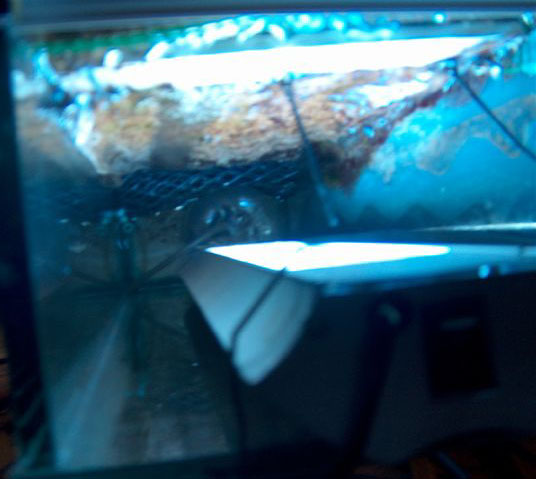
An algae scrubber, also known as a turf algae filter, a turf scrubber, an algae filter, or an algae turf scrubber (ATS) [(c) Walter Adey], basically filters your water clean of nitrate and phosphate so that the green on your rocks and glass goes away. It does this by "moving" the growth of the algae from the tank to a "screen" outside of the tank. The idea is that you create a better growing environment on the screen than occurs in the tank, so that the algae grows on the screen instead. It works great! Here is my display, January 2009, running on just an algae scrubber:
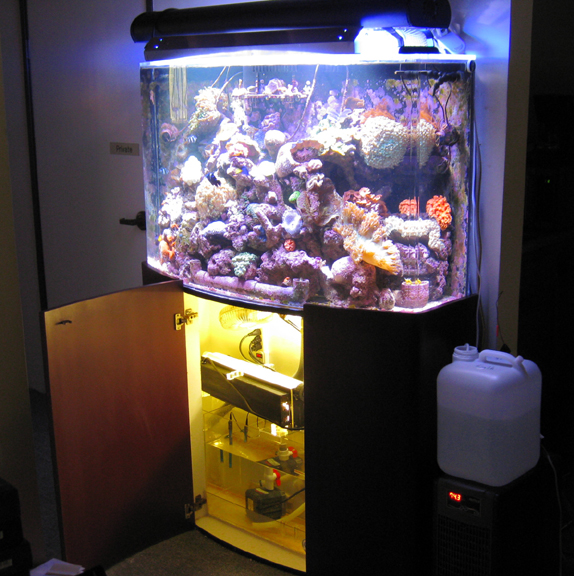
My scrubber (the black thing sitting on the sump) is made out of acrylic, but most people build simple ones like I show below. Here's what you can expect: If you build your algae scrubber properly, your nitrate and phosphate will be incredibly low, sometimes unmeasureable by hobby test kits, within eight weeks. I use Salifert test kits, and the readings I get are "clear" (zero) for both the Nitrate and the Phosphate tests. This is what you want with yours too. If you have been trying to obtain zero reading like this, then an algae scrubber is for you.
My nitrate and phosphate are zero (clear, on Salifert test kits), and the only thing in my sump is water and the scrubber. I removed the skimmer, carbon, phosban, polyfilter(s), and filtersock; I don't use ozone, vodka, zeo, or anything else. I'm feeding massive amounts too; enough that if I had my previous filtering setup, I'd have to clean the glass twice a day, and everything in the tank would be covered in green or brown algae. And it's not just my tank; over the last year, thousands of people have built their own versions of an algae scrubber, and every one has gotten reduced nitrate and phosphate readings, and many of them have completely wiped out all nuisance algae, right down to the bare rock, sand and glass.
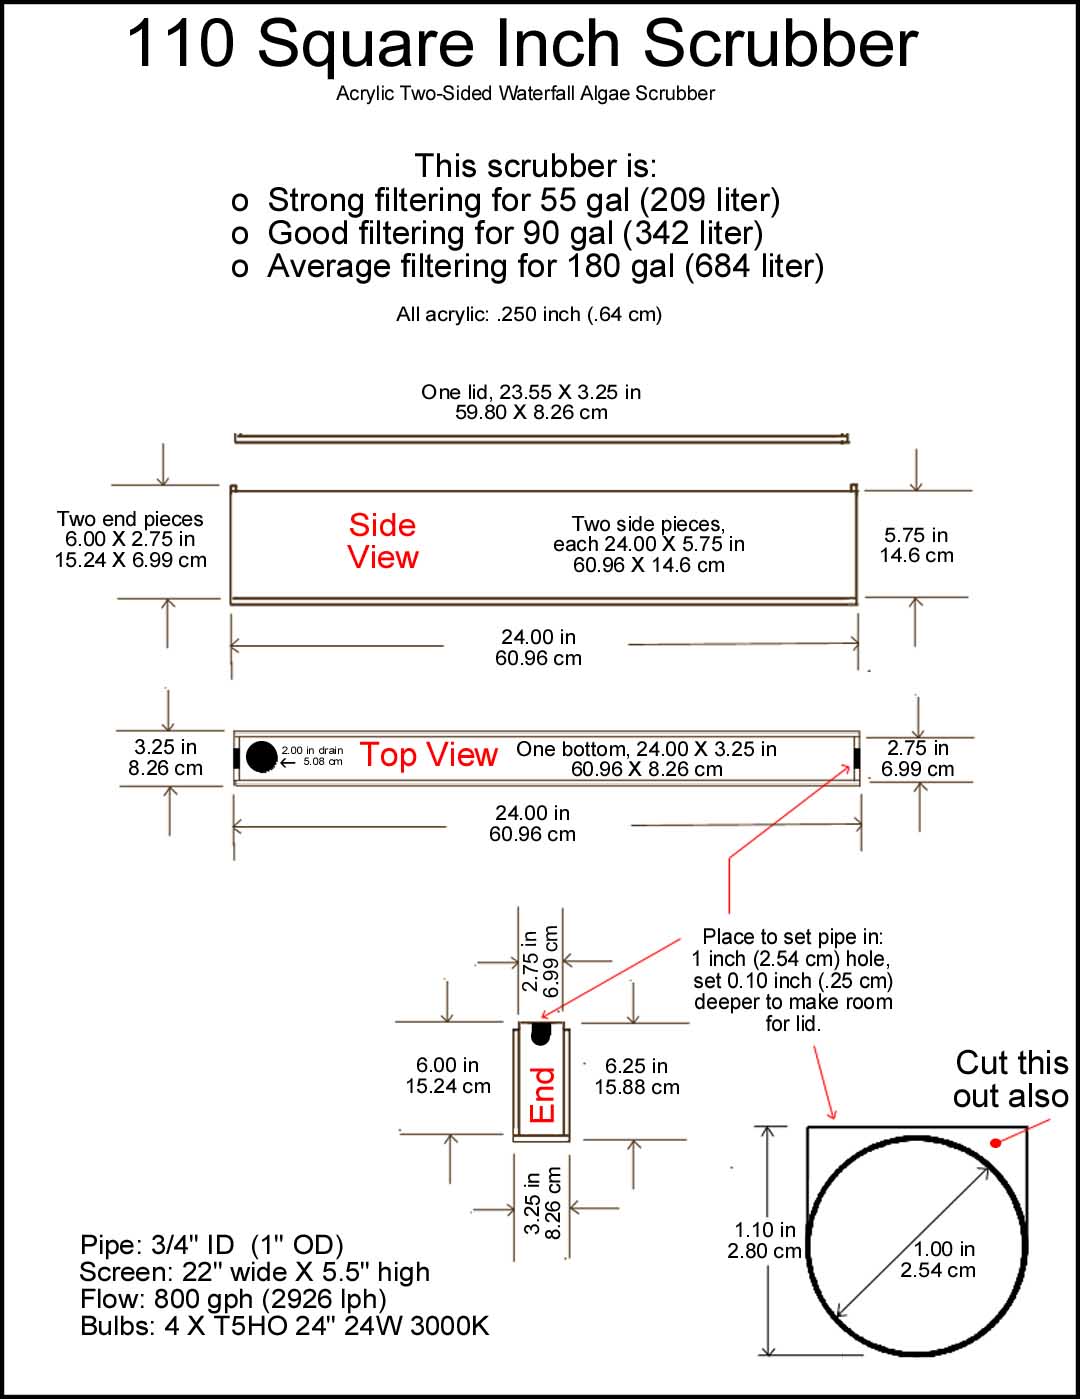
The only thing you need to decide on, is how big your scrubber screen needs to be, and how you will pump water through it. The basic rule is one square inch of screen for each gallon of tank water, if the screen it lit on both sides; the screen size should be twice as big if the screen is lit on just one side. A 10 X 10 inch screen, lit on both sides, = 100 square inches = 100 gal tank; a 7 X 7 inch screen lit both sides = 49 gal tank; a 6 X 6 lit both sides = 36 gal tank. Algae scrubbers get really small as you can see. A 12 gal nano tank needs just 3 X 4 inches if lit both sides, or 3 X 8 inches if lit on one side. This small thing can replace the skimmer, refugium, phosphate removers, nitrate removers, filtersocks, and waterchanges, IF THE PURPOSE of these devices is to reduce nitrate, phosphate and nuisance algae. If these devices have any other purpose (like growing pods, or removing food), then they can't be replaced.
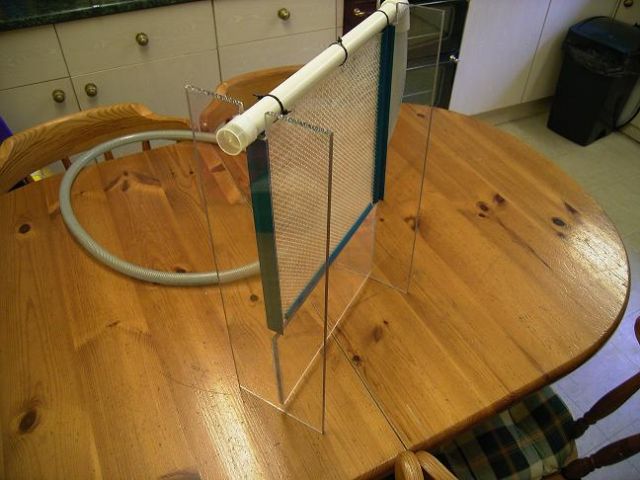
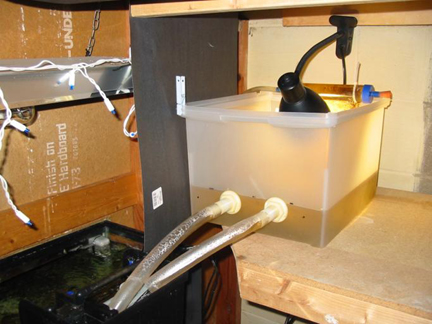
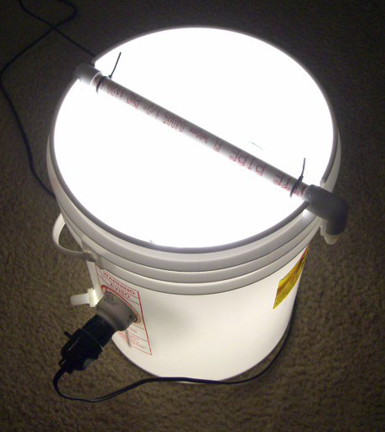
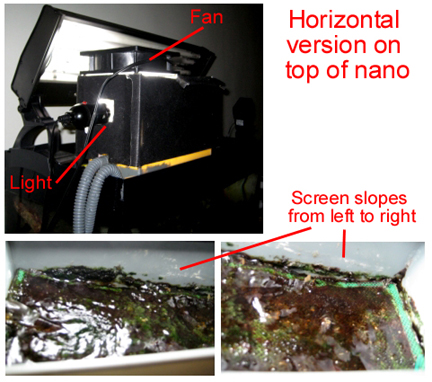
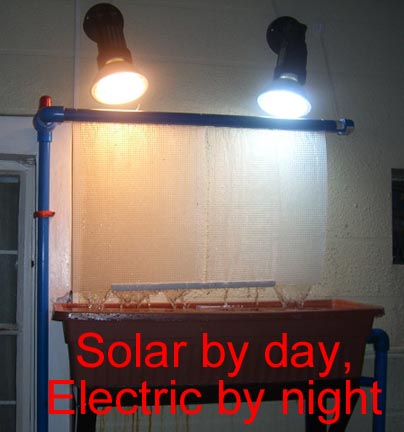
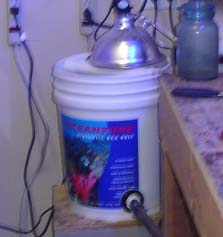
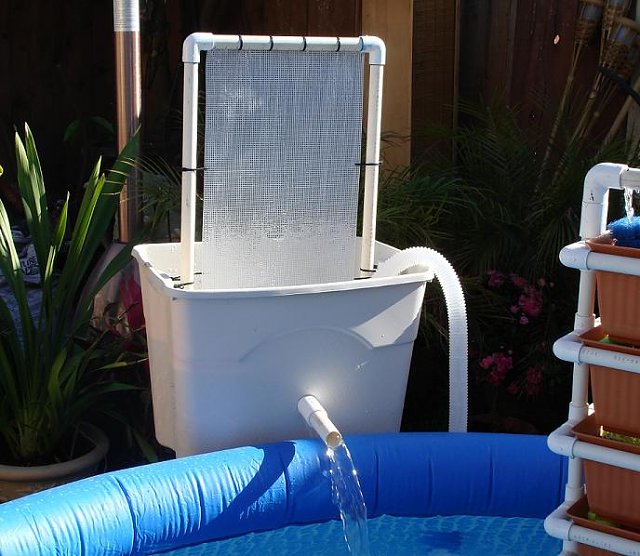
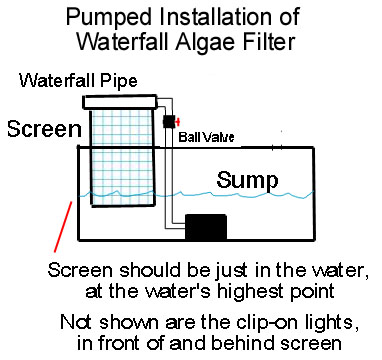
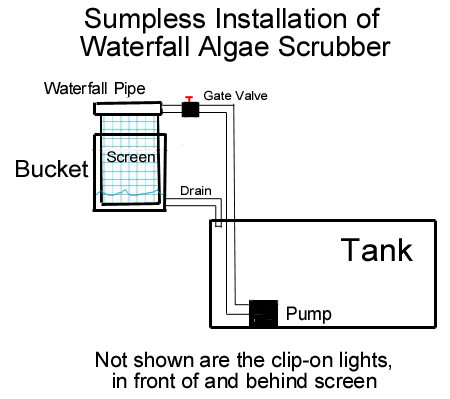
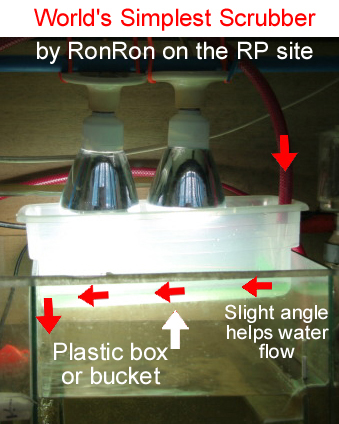
Here are some examples of DIY algae scrubbers, from a simple nano one with combined light for tank and scrubber:

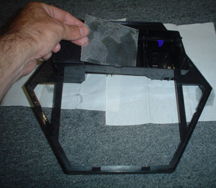

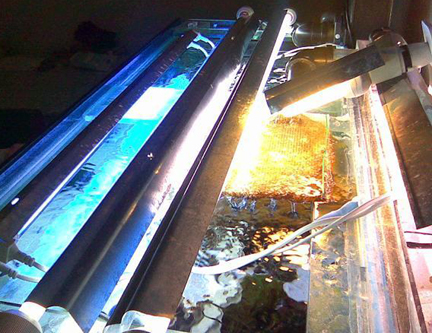
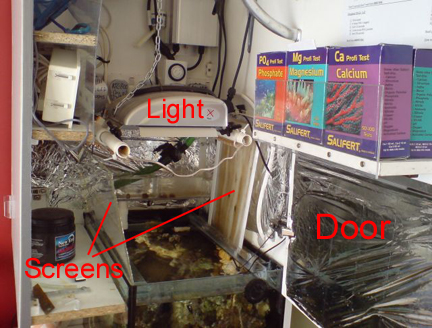
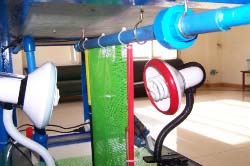
to larger ones:


Here are some advantages of an algae scrubber:
o Allows you to feed very high amounts without causing nuisance algae growth in the tank.
o Can replace waterchanges IF THE PURPOSE of the waterchange is to reduce nitrate or
phosphate or nuisance algae. Otherwise, it does NOT replace the water changes.
o Grows swarms of baby copepods (white specks that crawl on the glass).
o Increases pH.
o Increases oxygen.
o Will NOT spread algae into the tank. It removes algae FROM the tank.
o There is no odor from the algae (only a slight ocean smell when cleaning it).
o Is very quiet when flowing, similar to a tabletop decorative waterfall. Your pumps are louder.
o Introduces no microbubbles when built properly.
o Removes ammonia, nitrite, and metals too.
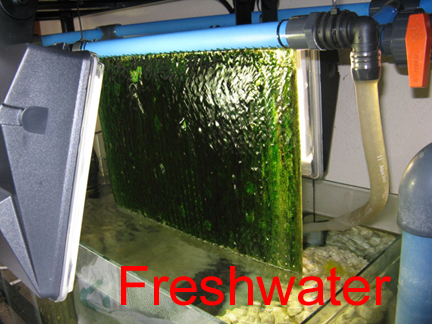
o Works in saltwater, freshwater, and ponds.
How to build it:
First, get your screen. Any stiff material that has holes in it, like knitting backing, plastic canvas, rug canvas, gutter guard, etc. Try going to hardware stores, craft stores, garden stores, sewing stores, or just get one of these online:
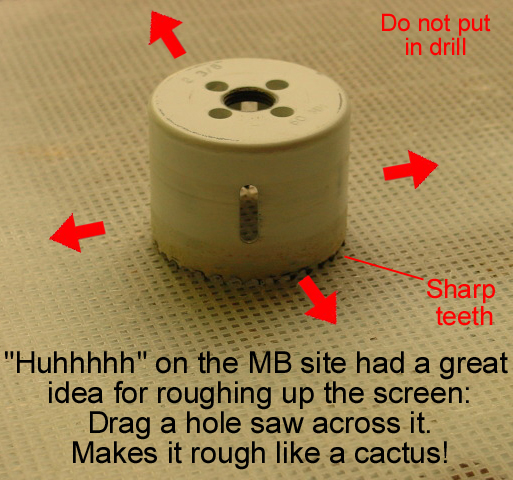
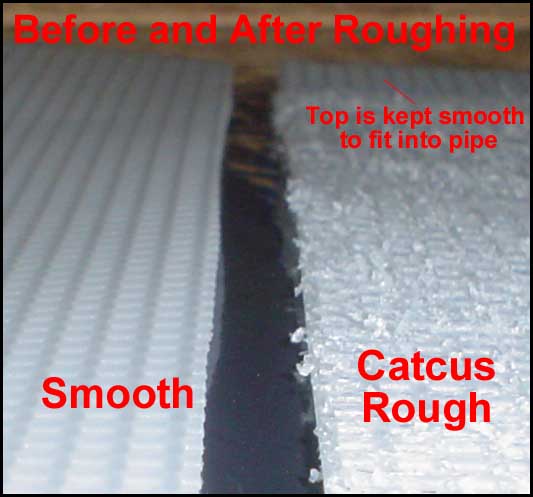
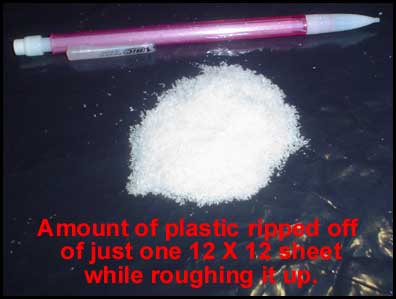
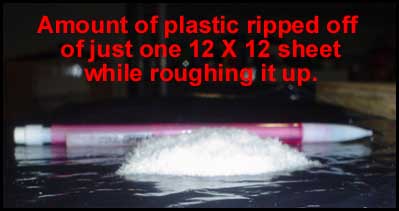
http://www.craftsetc.com/store/item.aspx?ItemId=43844Don't use glass or acrylic; algae can't stick to them. And don't use window screen; sometimes it has an algaecide on it. Whatever other material you use, it's best to use two layers of the material (helps algae stick better). Next you need to "rough up" the screen so algae will stick even better. Use a wire brush, 30 grit sandpaper, a very rough file, or (best) a hole-saw without the drill, to "scrape up" the screen so much that it will almost cut you if you rub your hand over it. What you end up with should look more like a cactus that a piece of plastic.
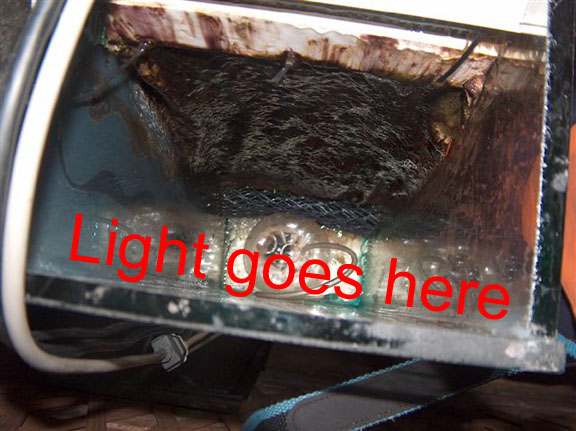
If you have a nano with a filter hatch on TOP of the hood, then it's super easy: Just cut a piece of screen to replace the sponge filter, and put it where the sponge filter went. Leave the hatch open, and set a strong light on it, facing down directly on the screen.
If your nano does not have a filter hatch on top of the hood, or if you have a regular tank, then here are the options for larger versions:

The first and main thing to consider is the flow to the screen. You need about 35 gph (U.S. gallons per hour) (133 lph) for every inch (2.5cm) of width of the screen. Thus, a 2" wide screen would need 70 gph, and so on. Here is a chart:
Screen Width-----Gallons Per Hour (GPH)
1" 35
2" 70
3" 105
4" 140
5" 175
6" 210
7" 245
8" 280
9" 315
10" 350
11" 385
12" 420
13" 455
14" 490
15" 525
16" 560
17" 595
18" 630
19" 665
20" 700
Note that for flow, it does not matter how tall your screen is, just how wide it is. Let's start with an overflow feed: In this case the amount of flow is pre-determined by how much is already overflowing; the maximum flow you'll get to the screen will be what's going through your overflow now. This is easy to figure out by counting how many seconds it takes your overflow to fill a one-gallon jug:
60 seconds = 60 gph
30 seconds = 120 gph
15 seconds = 240 gph
10 seconds = 360 gph
8 seconds = 450 gph
5 seconds = 720 gph
Take this gph number that you end up with, and divide by 35, to get the number of inches wide the screen should be. For example, if your overflow was 240 gph, then divide this by 35 to get 6.8 (or just say 7) inches. So your screen should be 7 inches wide. How tall should it be? Tall enough for it to stick into the water below (this will keep it quiet). But for flow, how tall it is not as important as how wide it is.
Pump feeds: Since with a pump you have control over the flow, start with the size screen you can fit into your space. If the screen will go into your sump, then measure how wide that screen will be. If the screen will go into a bucket, then measure how wide that screen will be. Take the width you get, and multiply by 35 to get the gph you need. For example if you can fit a 10 inch wide screen into your sump or bucket, then multiply 10 by 35 to get 350 gph. Thus your pump needs to deliver 350 gph to the screen.
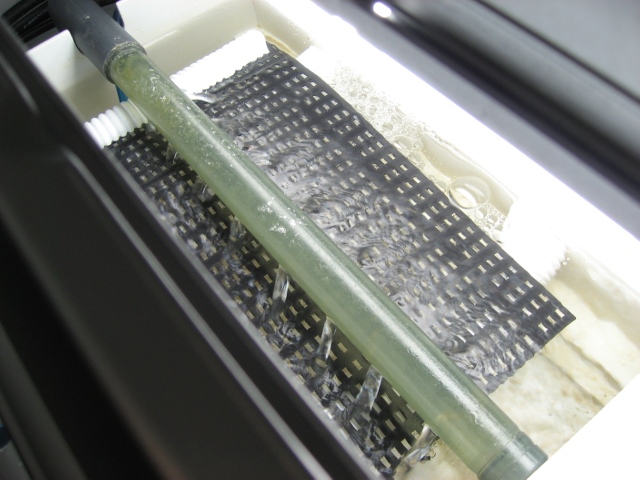
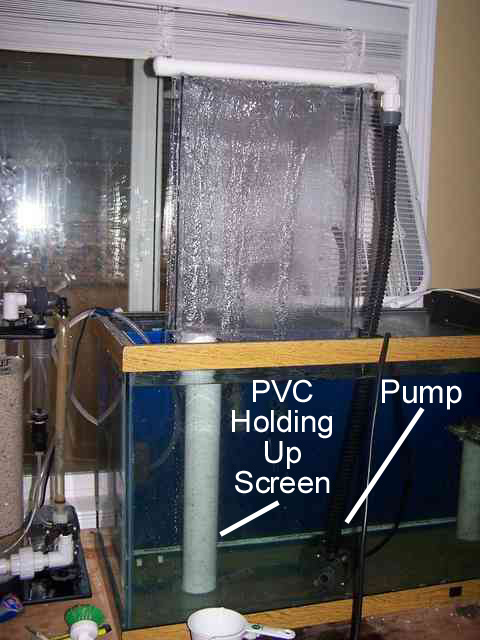
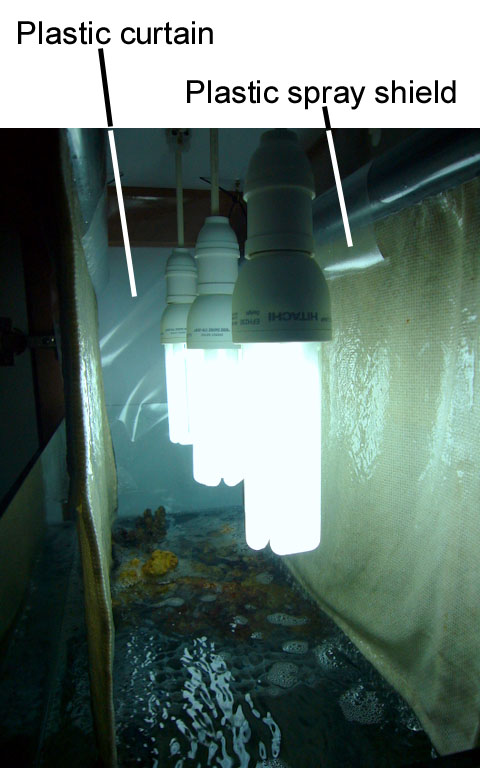
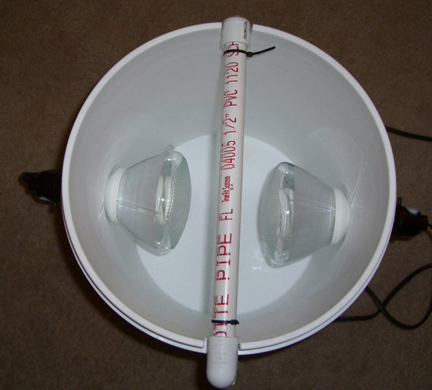
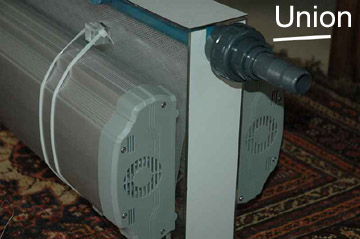
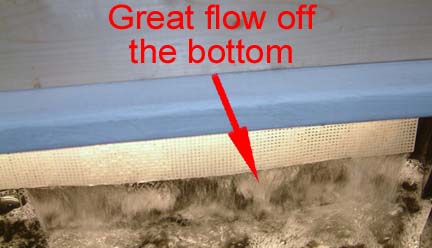
You can construct your setup using any method you like. The only difficult part is the "waterfall pipe", which must have a slot cut lengthwise into it where the screen goes into it. Don't cut the slot too wide; just start with 1/8" (3mm) for a single layer of screen, or 3/16" (5mm) for two layers of screen, and you can increase it later if you need to, based on the flow you get. I used a Dremel moto-tool with a "cut off wheel":
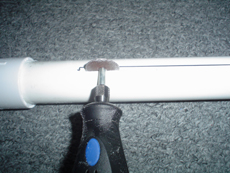
Some people don't know how to cut a slot, so they drill holes instead. This not a good idea, and is only a very last resort. You need to have a lot of holes to equal the flow of a slot, and most times the holes end up spraying water sideways. Also, holes are almost impossible to clean the insides. So get help if you need to, in order to cut a slot properly.
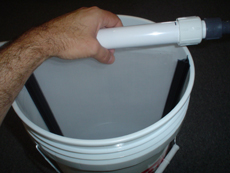
Now install the pipe onto the screen by tilting the pipe and starting at one side, then lowering the pipe over the rest. You may have to wiggle the screen in some places to get it to fit in:
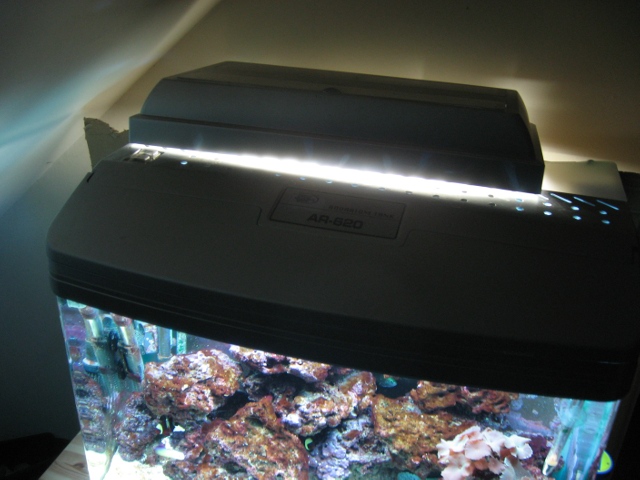
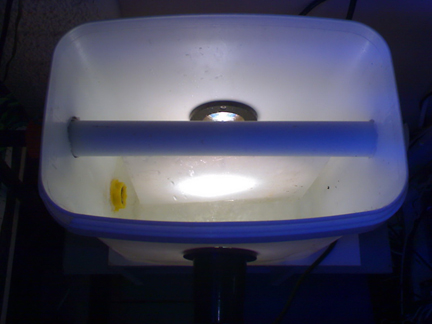
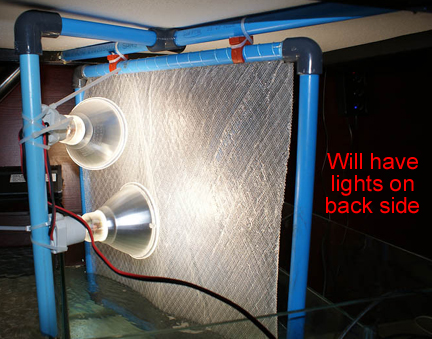
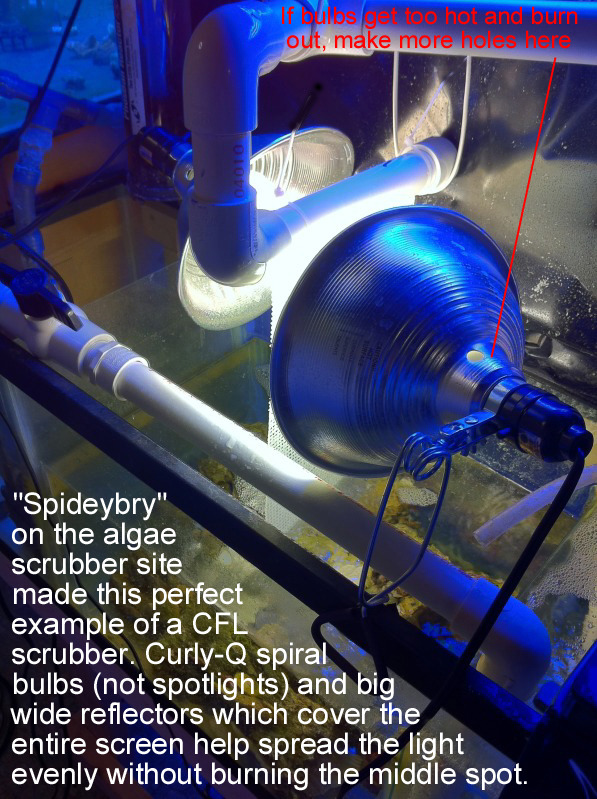
Lighting: This is the most important aspect of the whole thing. You must, must, have strong lighting. Start with something like this:
http://www.buylighting.com/23-Watt-R4 ... ood-2700K-p/tcp1r4023.htmThis 23W CFL bulb is the MINIMUM wattage you should have on EACH side of your screen, unless your screen is smaller than 8 X 8 inches. You can get even higher power CFL bulbs, or use multiple bulbs per side, for screens larger than 12 X 12 inches, or for tanks with higher nutrient problems. The higher the power of the lighting on the screen, the more nitrate and phosphate will be pulled out of the tank, and the faster it will happen. You (almost) cannot have too much light. When some folks report back that their algae scrubber is not growing algae or working well, the problem is ALWAYS that they used weak lights, or the lights were more than 4" away. Every single time.
Operation:
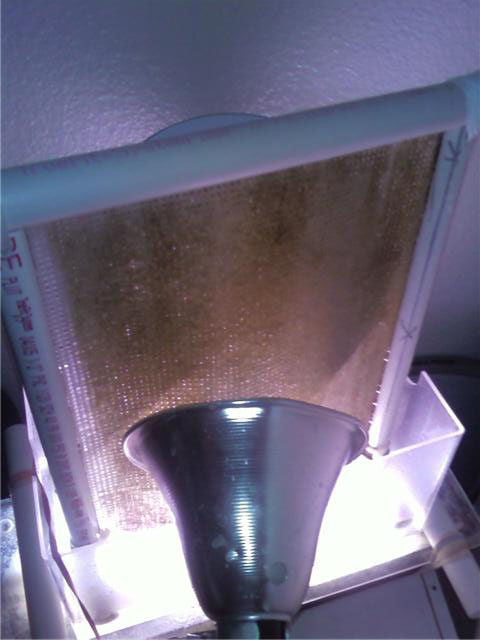
Regardless of which version you build, the startup process is the same. Put a timer on the light, 18 hours ON, 6 hours OFF. You will see absolutely nothing grow on the screen for the first two days. But on day 3 you'll start seeing some light brown growth, and by day 5 most of the screen should have a light brown coating. If this level of growth does not happen on your screen, your lighting is not strong enough (you used a weaker bulb), or it's not close enough to the screen (needs to be no more than 4" from the middle of the screen). Increase the bulb power, or move it closer.
When the screen looks something like this:
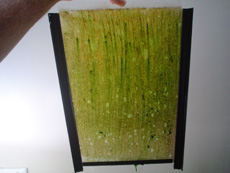
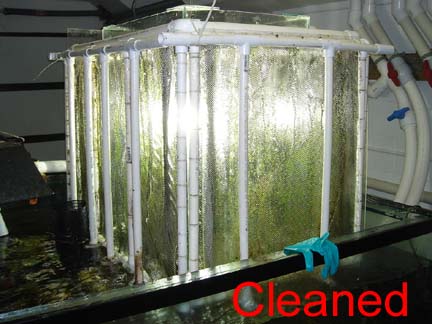
...then you want to give it a first cleaning. Take the screen to the sink, run tap water on it, and just push the algae off with your fingers (not fingernails):
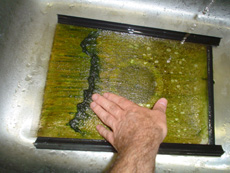
Wait a week (yes, 7 days) and clean it again. After a while you'll have to press harder to get the tougher algae off, and after a few months you'll probably need to scrape it with something stiff, and it may eventually get so strong that you'll need a razor blade to scrape it off. But for now, be gentle; you always want some algae to remain on the screen when you are done. NEVER clean it off completely. Algae has to remain on the screen to do the filtering. Also, NEVER wait more than 7 days between cleanings.
Don't forget to test your Nitrate and Phosphate before you start your filter, and each day after. I use Salifert:
http://www.marinedepot.com/ps_Aquariu ... s~test_kits_salifert.html Post your pics of how you build it, the growth day by day, and your nitrate and phosphate readings, so we can all see how you are doing! There is a lot of info that I did not include here (in order to keep this short), and I've been asked every possible question there is. So if you have an unusual situation, or you think you have thought of something "new", then post it :)
Note about skimmers: Scrubbers do not replace the function of skimmers, just the end result; (they both do different things). Scrubbers remove Nitrate and Phosphate, but leave food in the water for the corals and small fish to eat. Skimmers remove food, but leave Nitrate and Phosphate in the water. If you use both, you will be removing food, Nitrate, and Phosphate.
Note 2: Skimmers do not remove Inorganic Nitrate and Inorganic Phosphate, at all. They remove Organic Nitrate and Organic Phosphate, which is what food is.

